
First of all I want to apologise for making people give their names and email addresses when they want to leave a comment. It was the default when I set up the blog, and I should have found the setting I needed to change earlier and turned that off. I have absolutely no interest in harvesting email addresses and this blog is in no way a commercial venture, I just want to share my knowledge and contribute to the sewing community.
The Willara dress is by an indie pattern designer who lives in my local area, at least from the perspective of the many overseas readers of this blog. Her name is Pearl Red Moon, she does Lagenlook and her brand is called Boho Banjo. I am not in any way affiliated, but I think any one making Lagenlook patterns available to us aficionados deserves a bit of help and encouragement. This is her site, Boho Banjo Art to Wear
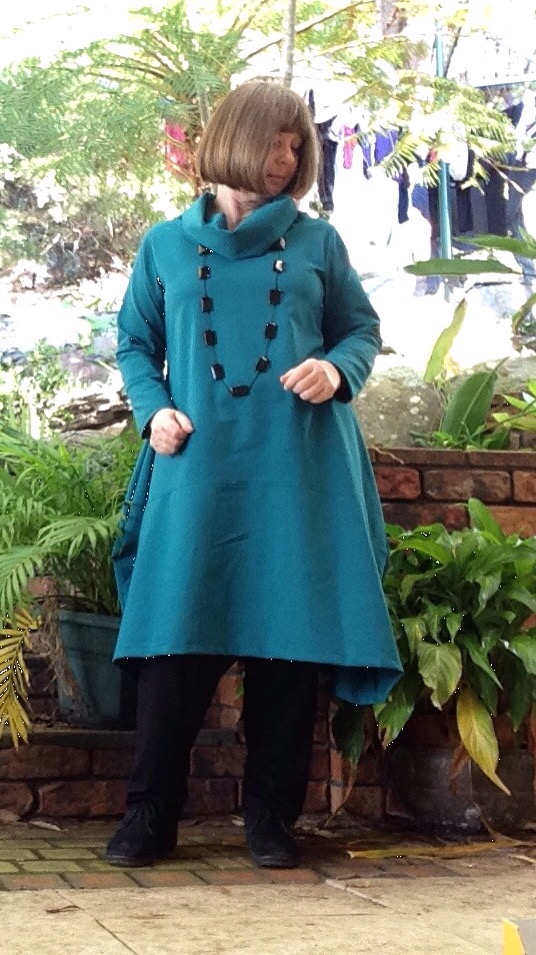
And this is the Willara pattern.

The Willara dress is a fabulous pattern, but before I go any further I need to warn everyone that as usual, I have adulterated it to suit my own purposes. Not because there is anything wrong with it, but because we are in the depths of winter here and the pattern is designed for summer, or at least for substantially warmer weather than this. Or for someone who doesn’t feel the cold, which is decidedly not me. Growing up in the cold climate of Central Europe has traumatised me to the degree that keeping warm is all I care about as soon as the temps drop below 20 Centigrade.
So, despite the lovely wide boat neck being a very attractive feature and a point of difference to other tunic patterns, all it means to me at present is a cold neck. This will change when the hot weather arrives, but for this winter version I had to do a cowl. I just couldn’t help myself.
I also used a ponte, which is possibly a bit stiffer and bulkier than you would want for the design, although I am very happy with the result. I am thinking of a nice silk charmeuse I have in my stash for another version down the track, but a knit or soft cotton or linen would work as well.
The pattern is very economical with fabric, and even economical to print. 40 sheets of paper are not a lot for a dress. I re-use misprints from work and print on the back to save the trees. You can save even more paper by not printing the straight rectangular lower pattern piece of the dress. I just measured the width of the bottom edge of the upper part, which was around 108cm front and back, and then cut two rectangles with that length and 37cm wide. I am 161cm or 5’4″ tall, and the length is good.
But BEFORE you print, be aware that you need to set your printer to landscape. Despite this being in the instructions and obvious from the picture, I managed to ignore it and ended up with everything printed sideways. Not good. Also, on my printer, the extra paper that is usually around the edge of each pattern page, and needs to be partially removed when the pattern is assembled, is only on two sides, not all around. I’m not sure if this is something I have done or the way the pattern is set up, but I LOVE, LOVE LOVE that! Normally there is a frame of a couple of centimetres around each page, some of which needs to be cut off before you can match each page to the next. But with this pattern, having the excess only on two sides means that the pages are able to be assembled without having to cut off any of that excess, you just overlap the paper like the scales of a fish.

How good is that?

Once the pattern is taped together, the cutting takes no time at all. I use a rotary cutter and two large cutting mats, and I have to say that this has made a huge difference. I used to hate cutting out and fantasise about someone doing it for me, maybe the good fairy, but since I stopped grovelling on the floor with pins and scissors it so no longer an issue. I have my cutting mats permanently on a table, which could be a dining table with a cloth over the top, and when I need to cut out I just lay everything out, put a few weights on the pattern pieces (pebbles) and it is done in no time. My back is very happy.
Sewing the Willara was uneventful, everything goes together very nicely. The only tricky bits are the ‘points’ at the sides and I am sure there is something about how to do them in the instructions. I didn’t really use them, although I had a quick look and they seemed very comprehensive. I used my overlocker/serger for most of the seams, and my coverstitch for the hems, so the whole dress was finished in a couple of hours. I did have to do some topstitching as the ponte has a fair bit of man-made fibre in it and wouldn’t iron down nicely. Using better behaved fabric where the seams iron flat nicely, so you don’t need to topstitch, will make sewing even faster.
The sizing is generous. I am around 72kg, with a bust of 101cm, not slim, but according to the size table I made the smallest size. It fits just fine. The sleeves are reasonably wide at the top too, so I don’t think those with a prominent biceps will need any alterations, but better check. I lengthened the sleeves to full length (did I mention that it is cold?). I will be using both the short and 3/4 length in future versions.


So thanks, Pear Red Moon for this lovely pattern. I think it will be another TNT for me.


I’m so happy to see this sewn together! I have the pattern but haven’t even taped it together yet…and I don’t think I printed it landscaped either. I actually got it free! I think every month or so they offer one free pattern so its worth getting on the mailing list
LikeLike
Thanks Charlotte, I did get this last month when it was the free pattern. Hope you get good results with it too.
LikeLike
I love that dress…it looks very nice on you and I can understand why you want it to be your new TNT pattern! Last week I ordered 7 Tina Givens patterns because I love Lagenlook too. They haven’t come yet, but I think/hope it’s going to be fun making them. …my first Lagenlook clothes!
LikeLike
AND I do NOT have any connection or any vested interest in Tina Givens patterns. LOL!!!!
LikeLike
I was very unhappy with the service at Tina Givens. It took two weeks to get pre printed patterns of that I still had to put together…made me cancel my membership. I might still print at home but their service is terrible.
LikeLike
Charlotte, I think Tina Givens patterns have become popular very quickly and outgrown their staff level, which is probably modest. I had some trouble with the download at some point a few months ago and had my email answered very promptly. I much prefer the downloads to paper patterns and once you get the hang of it they go together quicker than tracing. But YMMV.
LikeLike
Lovely! I really like your collar – the boatneck on the drawing appears to be very wide and not particularly in balance with the dress. Looks great on you.
LikeLike
Thanks Coco. I like the look of the boat neck, but not in the middle of winter. But I will be measuring carefully when I make it up and possibly narrow it a bit. My shoulders are square but narrow, if that makes sense. I was also thinking about setting short wide straps into the boat neck if necessary to make it bra friendly.
LikeLike
I noticed that the designer George Simonton adds small wedges of fabric into his boatnecks. That way you get the flattering cut of the neck but bra friendly. He does topstitch the wedge in place by the way.
LikeLike
Brilliant! Thanks for the tip.
LikeLike
I love how this turned out! Fabulous!
LikeLike
Thank you!
LikeLike