I have been enjoying playing with different colour washes on linen and have been thrilled with the vibrancy of my dye colours on that fabric type compared to other fibres such as cotton.
For example, here is a similar top I made previously using cotton. This was always meant to be a toile to try out this particular design idea on cheap fabric before I risked spoiling the more expensive linen. However, this toile turned out so well that it has taken me years to get around to the real thing.
Still, there is no denying that the linen version looks a lot more high end and the colours are so much more vivid.
The difference doesn’t come out so much in the photos, I think my trusty iPhone camera does some fudging to make photos look better than reality, even if I don’t use a filter. But look at the cotton and linen versions side by side.
Some people might prefer the lighter colours of the cotton top, but the plain surface texture of the fabric makes it look much more pedestrian than the linen garment. Unfortunately that part doesn’t come out so much in the photo.
I put some black abstract shapes done in screen printing ink on top of the dye wash and I think the black sets off the colours .
Previously I did a couple of tops in a green and a blue colour wash without any black. (The pattern for both is the TessutiAthina, the green is the shorter and the blue the longer version.)
Both tops look pretty but I wonder if the addition of a some sort of black shape wouldn’t add something. For instance, I was born in the year of the horse, so maybe I could paint a Chinese horse calligraphy over the top of the colour? I have mocked this up in Photoshop, what do you think?
Or is it better to leave well enough alone? Conundrums…
The summer hasn’t turned out anywhere near as hot as promised by the weather people, so I’m not hanging out in loose dresses the way I thought I would. I really prefer pants if the temps are reasonable and you can never have too many of those. I’m still looking for the pattern that will make me look tall and slim when I’m not. 🙂
It always inspires me when I see somebody in the real everyday world in a great outfit, and I saw some absolutely fantastic looking culottes/wide pants/whatever the other day at the shops. Unfortunately she would have just thought I was a weirdo if I had waved my phone and asked to take a pic, but that silhouette did stick in my head.
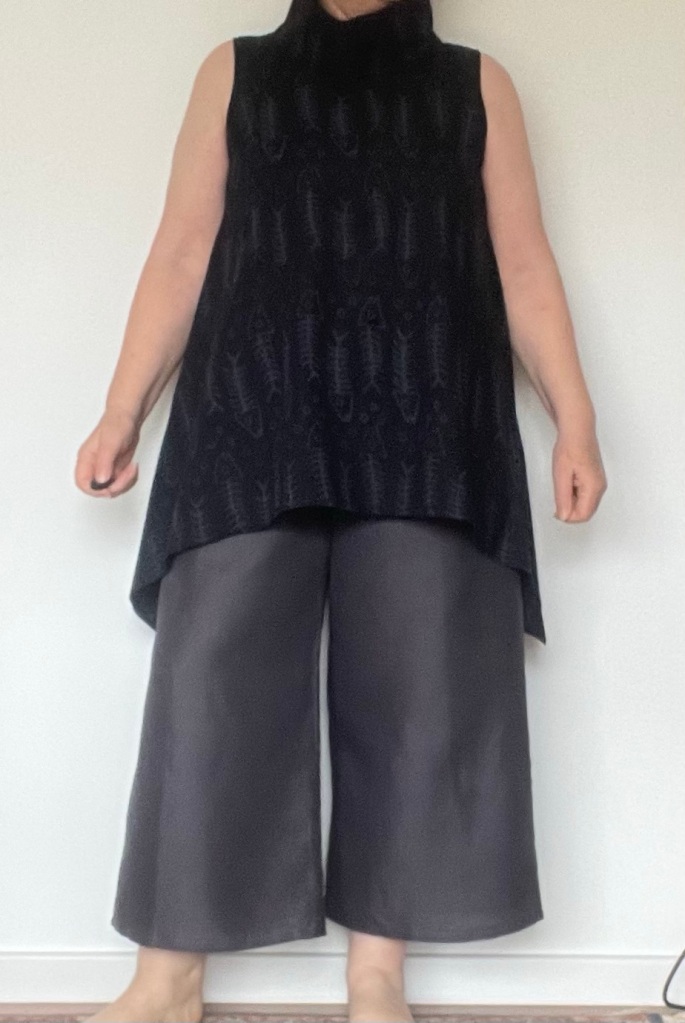
So here is my take on it. She did wear a long tunic with those pants, and I have tried to reproduce that here with one of my old tunics with the extended sides. I think that hem is a bit dated now, although to me it still looks good.
Something shorter is probably more current, and because I can’t leave my fingers off the paint pots it has an abstract motif on it.
Here is a closeup of the culottes.
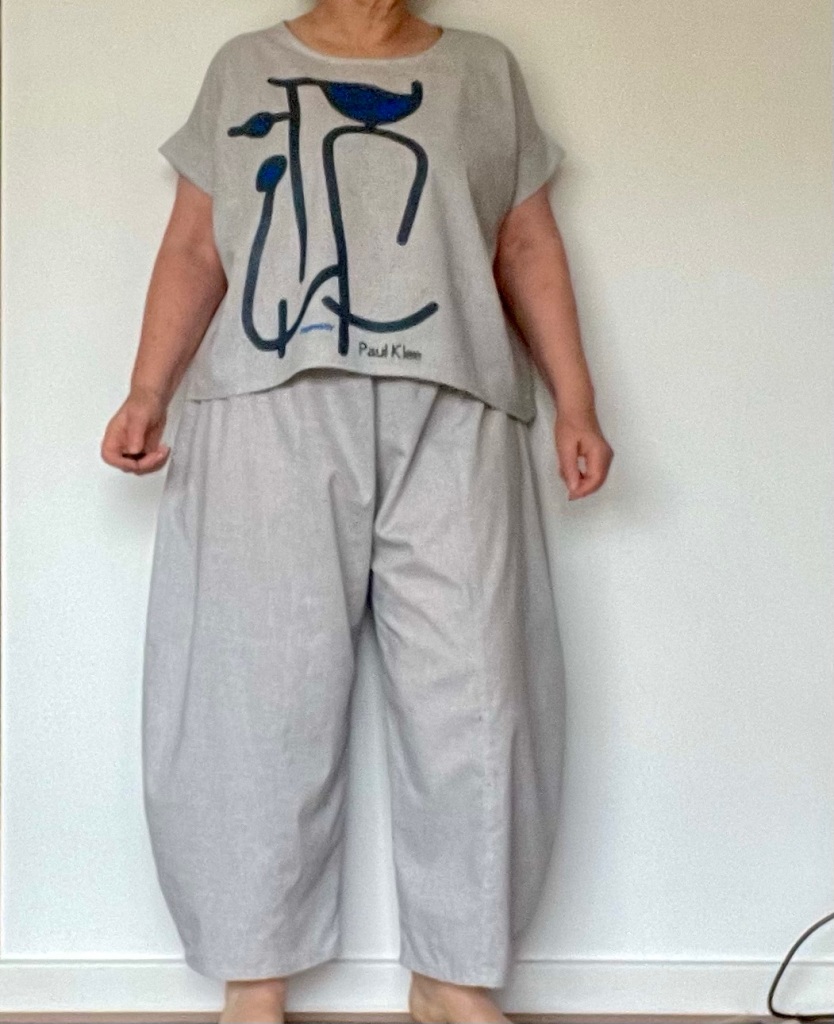
The second outfit was more motivated by an idea for the top. I love Paul Klee’s paintings and hope he won’t be turning in his grave at my interpretation of one of his works.
I wish I had used a lighter blue, but it’s hard to change and so far it hasn’t annoyed me enough to motivate me to do that.
The whole set looks a bit pyjama-ish, but I believe matching top and bottom is coming back. The pants are the Sew Liberated Arthur Pants pattern, the top my usual mutilation of the Tessuti Mandy. Yes, that’s a t-shirt pattern and for knits, but hey, I have made it work for about 50 woven tops so far, so don’t tell me I can’t.
The fabric I used is from a repurposed Ikea curtain. It’s a lovely light grey cotton chambray, thin enough for me to try a version of the Arthur pants that is almost as voluminous as the pattern designer intended. (Normally I use bottom weight fabric which necessitates cutting the volume down lots). The light fabric is easy to wear, but pockets were not an option as the pocket bags would have shown through. Maybe I will add patch pockets if this bothers me too much, but I think the fabric is too flimsy to hold up an iPhone anyway.
My figure type was never meant for classic pants, so I am always on the lookout for variations that distract the onlooker from the fact that really don’t have impossibly long legs like the models or slim hips either. My three go-to patterns at the moment are the StyleArc Bob, the Sew Liberated Arthur and an older Marcy Tilton pants pattern, now unfortunately out of print.
The Marcy Tilton pattern is the one most suitable for hacking in order to experiment, and my latest permutation was to leave off the bottom part and widen the legs quite generously to achieve an A-line shape for each leg.
The fabric used is linen and the sewing details are on PatternReview.
The pants below are made from a heavier fabric, a white cotton twill. I put patch pockets in front as well as in the back to avoid the pocket bags showing through, as you see so often with RTW pants.
In the version below I put in a waistband and fly because the fabric is quite a heavy cotton duck. I also put some tucks in the hem to gather in the width for a different shape.
And here is a similar one without the tucks but with horizontal seams at the knee.
Last year I had this brilliant brainwave of stencilling Beethoven’s ‘Ode to Joy’ on a dress for Christmas. As it turned out I didn’t like it at all when it was done. Needless to say, the dress got shelved in favour of another outfit.
But I had only stencilled the front and I still had quite a bit of the navy viscose/cotton left, so this year I decided to rescue the dress by cutting a new front. This looks much better, the fabric has a nice subtle lustre and I am too traumatised by the previous stencilling failure to attempt any more interference with the elegant simplicity of the plain navy. I’m wearing it here with silver beads, but I think a long pearl necklace would also look good. I have a nice baroque one, pity I didn’t think of that when I took the photos.
But keeping my fingers away from the paint pots wasn’t easy, so to distract me I decided to make a second dress from the same pattern where I could give free rein to my artistic impulses and throw paint at it to my hearts content.
You can see the pattern of the dress a bit better here, the ‘points’ are tucked in to give the skirt its shape.
The pattern used is the StyleArc Toni, heavily modified to eliminate the front seam and the collar, with a cap sleeve added. The fabric for the navy dress is viscose/cotton and for the tan cotton sateen, both repurposed from sheets bought on special.
Now the only problem is, which one to wear for Christmas? I am leaning towards the tan and black for Christmas Day. Mr Rivergum says the painting reminds him of reindeer antlers.
That leaves the navy dress for New Year’s Eve. But it’s anyone’s guess whether I will be able to resist making paint-based improvements if I have that much time on my hands. A bit of silver would look awfully good with the navy…
It is getting hot now, being an El Niño year, so I thought long, loose linen dresses would be just the thing to keep me cool this summer.
For my first one I chose a pinkish-grey-mauve linen, which looks lovely, sophisticated and cool. But unfortunately it soon became clear that teamed with black this colour instantly turns to anaemic and washed out. Too late, once the black ink is on the fabric there is no way back.
So I finished the dress and took photos, which sometimes makes me change my mind. But this time it only confirmed what I had feared, the two colours did absolutely nothing for each other.
There is no way to change the black ink to something lighter, but thankfully the base colour is easy to overdye and I have a whole arsenal of dyes with which to attack this problem. Not that I would want to use them all at once. 🙂
The idea was to deepen the colour, to make it hold its own against the black. Dyeing can be a gamble, but I keep notes on previous dye projects which help a lot, and also have a fair bit of experience now. I am really happy with the result. The main thing to remember with linen is that you need only a fraction of the amount of dye that cotton takes for the same colour depth. I used as much soda ash as I would with cotton and there was very little dye left unfixed. This is great because that way it is much quicker to wash the garment out after dyeing than if there is lots of dye left in the water, and it’s much less wasteful too. And in case you are wondering, the printing ink is not affected by the dye.
So here is the dyed version (enthusiastically photo bombed by Amadeus, the Siamese kitten).
The pattern used is the Tessuti Lily linen dress, with the elbow length sleeves modified to cap sleeves.
Since we bought our current house a couple of years ago I have toyed with the idea of painting a mural on a huge retaining wall that borders our front courtyard. The wall is around 10m wide and 2.5m high, so no project for the faint hearted. On the other hand it’s only paint. If you hate it you can just cover it over with a new coat.
I do have an artistic streak, but I always say I’m only like a DJ: I don’t write or perform the music, but I take the existing and re-arrange it into something different. That’s what I do with the clothing I paint, none of it is strictly speaking an original art work.
So I wasn’t going to start painting something from scratch on a 10×2.5m wall. My trusty source for material is Pinterest, which pretty much has every image you could ever want, but it took me a long time to find something I loved and felt at the same time reasonably confident that I could execute. Not to mention that there was an unhealthy dose of procrastination before I finally pushed myself into tackling such a big project.
Ironically the image I finally settled on is a wallpaper mural I could have purchased. I happily would have chickened out of painting it myself and done just that, except that my space is so much bigger than the largest size available, and it would just have looked silly. Like a shag on a rock, as we say in Australia. On top of that issue the retaining wall is prone to moisture and outdoor paint will withstand even the repeated trickle of water when it rains, which would certainly wreck wallpaper.
You can see in the photo where the base colour paint has had to be scraped off because it was coming loose from the masonry. I am hoping this will not happen as much again with the right paint, but if it does I can touch it up.
I love the dark green and white of the original, but for my DIY version I needed to use light colours as the court yard is a bit dark, with the garage mostly overhanging it. This is useful protection from sun and rain, but cuts down on light. The colour the wall had been painted previously had been a light neutral and I decided it could stay as a base colour. The contrast needed to be something light and I decided on a sunny yellow to brighten things up.
To make the image fit my wall I had to change it a bit and expand it horizontally in Photoshop to make it into the right proportions. I printed the image off over several pages and stuck it together (lots of practice with patterns came in handy). Of course that wasn’t anywhere near the size of the wall, but big enough to draw a grid on the paper and for each square to be a good size so I could see clearly when transferring the shapes to the wall freehand.
The wall is made of besser bricks and I could use this to draw a grid pattern with chalk without having to measure it all out, which was a big help. Once I had the same grid on the wall as on the paper, drawing the shapes was not as difficult as I had feared. An abstract image is just so much more forgiving than something pictorial (so I won’t be painting any grain silos any time soon). It helped to use a different colour chalk for the image outlines so I wouldn’t get confused with the grid lines. Then it was only a matter of judging where the lines should go in each square and where they should hit the grid guidelines. That needed some concentration, but wasn’t too bad.
The great thing about using chalk is that you can wipe it and start over if it isn’t quite right. I ended up doing that a fair bit.
Once I had chalk outlines on a couple of squares I started to fill them in with paint. This was to gauge how it would look, if the colours I had chosen were right and if the grooves between the bricks would distort the shapes. Getting the shapes chalked on the wall is by far the most difficult part of the process and I didn’t want to get the whole wall done before discovering that there is a problem.
It was great to see that the yellow colour I had picked for the shapes was right at the first try, quite a miracle as everyone will understand who has ever painted a room.
Using a small brush for the tight curves and a larger one for the bigger spaces it took me three days to get the first coat on including the chalk lines, and two days for the second coat. I haven’t completely cleaned the chalk lines of the grid off yet, but I don’t think that will take long. They are not all that visible on the photos, you need to look very closely for the pink.
It was nice to discover that a mural is so much easier than painting a garment, as you can overpaint if you make a mistake. With fabric, once the dye or ink is on, it’s there for good. Too bad if you don’t like it.
So here is my finished mural after the second coat of paint.
Now I am flush with success, I am champing at the bit for some nice pots and furniture in that space. The table is just right, but needs chairs and I would like some outdoor seating as well. If I stick to neutral colours with the furniture and just pick up the yellow and maybe add some turquoise with cushions, I have the choice of changing the mural in the future if I find something I like even better or feel like a change.
Has anyone else noticed how erratic the weather has been lately? The temperature changes are phenomenal. We have had 35C one day and 17C on another, all within the same week. Ok, it’s spring, so some variation is expected, but really?
So here is a dress for the freezing cold. The fabric is ponte (Romanit) and the double layer cowl keeps me nice and toasty. The light colour isn’t particularly low maintenance, but it’s a comfy outfit for a more dressy lunch. Not that I go to many these days, sigh.
This is the shape of the skirt part. The pointed bits are tucked into themselves to produce the tiered shape. You could leave them out to dangle, but I prefer them tucked in.
And here is the close up of the cowl. The fabric is double to give it more body so it will collapse into itself in a pleasing manner instead of hanging off my neck like a wet pancake. At least that’s the plan.
The top of the dress is a plain round neck and fitted shoulders, taken from a classic long sleeve tee pattern. The lower half is the StyleArc Toni Designer Dress pattern, heavily modified. Essentially I eliminated the CF and CB seam and merged it with the t-shirt pattern.
And for the super hot days of this crazy spring, here is a short sleeve linen number.
I have gone back to a more classic A-line silhouette for this summer. Much as I love the cocoon look, it doesn’t suit me, and slow learner that I am, I have a lot of dresses to prove it.
The fabric is a repurposed Ikea curtain, 100% linen and specialled off at a ridiculously cheap price. I bought a lot of these curtains and have found that they wear really well. Which is a good thing as I have made quite a lot of garments using it. The pattern is the Tessuti Lily linen dress, lengthened by about 12 cm, and modified to have short sleeves. I skipped the patch pockets in favour of inseam ones.
P.S. I forgot to mention that the black motifs are done with American type freezer paper stencils and black screen printing ink. The freezer paper has a shiny side that sticks when ironed onto the fabric and can be peeled off again, after you apply the ink, without leaving a residue.
Last spring in Berlin I picked up some digital print panels at the itinerant fabric market. It took me a while to work out what to do with them. There is a main feature print placed in a spot on the panel that is probably meant to go at the front of a top or short dress. Boob territory, so to speak, which is not my favourite spot for a ‘look here’ feature. Plus I wanted a maxi dress instead of something shorter, so this is my first try with one of those panels.
It wasn’t easy, and in the end, after a lot of furious frowning and wrinkling of brows, I decided to put the eye feature a bit lower down, high over my stomach. Very appropriate, as I indeed tend to see with my stomach. 🙂
So that was fine for the front. The back turned out to be the bigger headache and there was no way to get a back on that dress without piecing it. Sometimes you can get away with that pieced seam being hardly noticeable, but not this time, due to the colour variation across the panel. The upper section is so very obviously different from the lower.
I think I might experiment with the off-cuts and see if I can bleach some spots into the dark brown upper back section to make it blend in a bit more with the speckled lower one. Or maybe I should leave well enough alone. I have worn the dress several times since making it, so it hasn’t annoyed me that much.
The fabric is a cotton jersey and the pattern is a blend between my favourite tee (no longer available) and the Tessuti Lily dress for the skirt part. I had to reduce the width a bit at the hem to make it fit the panel and lengthen it by about 15cm. An easier way would have been to use the long version of the Tessuti Frankie dress pattern.
Iron-on vinyl is making things possible that just aren’t with the freezer paper, mostly because it has a backing. This holds the ‘floating bits’ of more intricate designs in the position they are supposed to be, so you don’t get the distortions you get from flimsy paper, especially once you have cut multiple holes into it. With vinyl the edges are absolutely sharp too, no leaking here and there. I am mostly able to touch this up, but it can still be a problem in some instances. The vinyl works particularly well with the abstract art I’m into at the moment, which is more intricate than the Marimekko type stuff.
It has taken me this long to get enthusiastic about the vinyl because I had some bad experiences with the shiny kind, that just made the result look cheap.
But the matt kind is lovely and I have been playing with that with great results. It doesn’t have the colour graduations of the original art work, but it’s still pretty good.
The vinyl also works in combination with using freezer paper for the simpler parts of the art work, and then the vinyl over the top like this tee below. It is my interpretation of a Franck Vidal painting, almost the same but not quite.
As always, there are horses for courses. The vinyl is good for intricate lines and small areas of colour, but not for overall colouring of a garment. Why not? Because it does leave a coating, not enough to make the garment uncomfortable in small doses, but a total cover would be like wearing plastic.
The other limitation is that the vinyl is opaque and there are no colour graduations. Not like the luminous colours and subtle blending of hues when working with dyes.
So even though the dyes are so much more of a headache to work with, they still have their place.
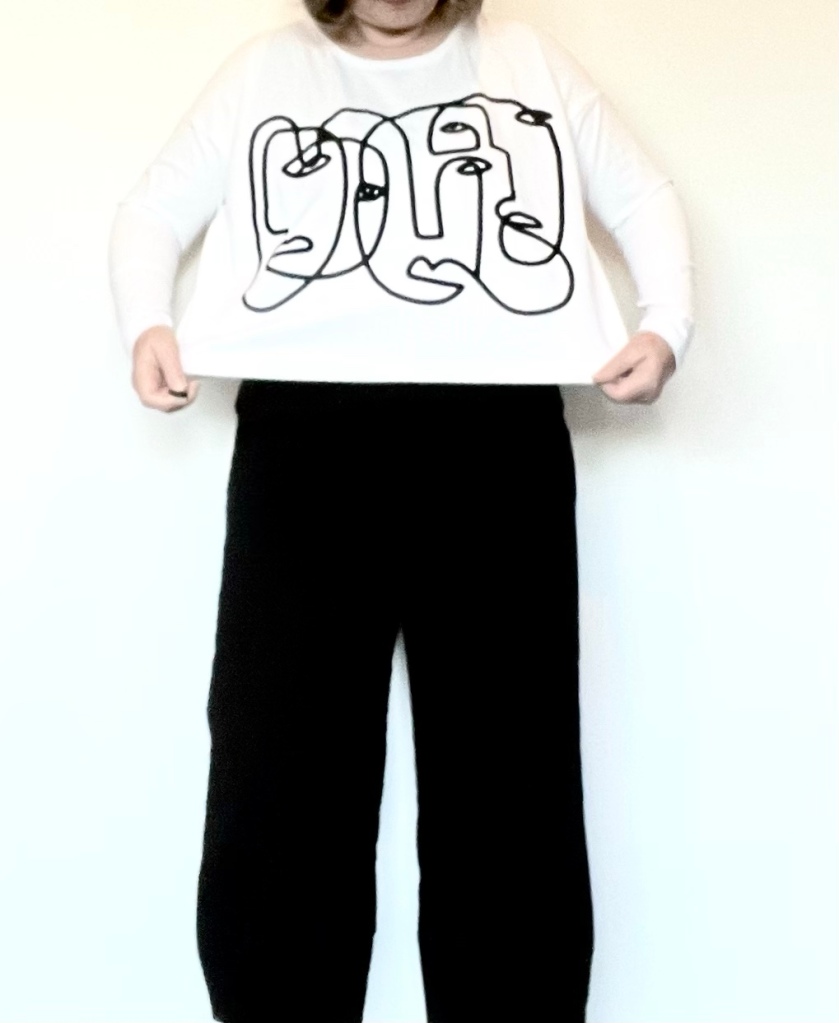
Most people who follow this blog will know that I love minimalist abstract art. For a while now,I have wanted to make something with the line drawings of faces you see on some garments online.
From Sew Tessuti Blog
An all-over design like this is a bit too ambitious for me technically, and a single motif is enough in any case.
Bewildered by Shira Barzilay
I liked this drawing in particular, plus it had the landscape aspect I like for a tee. I decided to make the lines thicker though for more impact on white fabric.
Unfortunately the drawing was far to intricate for my usual method of making a stencil out of freezer paper and painting with screen printing ink. It was a case for iron-on vinyl, which I have used before, although not often and not always with great success. This time I followed the instructions (always a good move!) and it came up really well. The cutting was done with my Cricut cutting machine.
The fabric is a nice beefy viscose jersey and the pattern is the Tessuti Mandy with a round neck instead of the boat neck in the pattern, and shortened to upper hip height.